

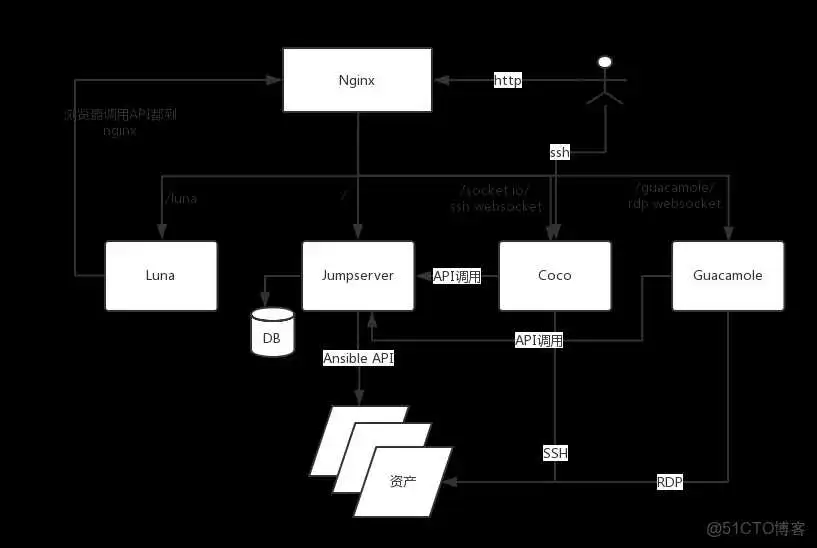
Jumpserver 是全球首款完全开源的堡垒机,使用 GNU GPL v2.0 开源协议,是符合 4A 的专业运维审计系统。Jumpserver 使用 Python / Django 进行开发,遵循 Web 2.0 规范,配备了业界领先的 Web Terminal 解决方案,交互界面美观、用户体验好。 Jumpserver 采纳分布式架构,支持多机房跨区域部署,中心节点提供 API,各机房部署登录节点,可横向扩展、无并发访问限制。
安装依赖包
编译安装python
建立 Python 虚拟环境
因为 CentOS 6/7 自带的是 Python2,而 Yum 等工具依赖原来的 Python,为了不扰乱原来的环境我们来使用 Python 虚拟环境
这里直接使用二进制安装包安装,具体可参考之前的文章
LAMP架构应用实战MySQL服务安装
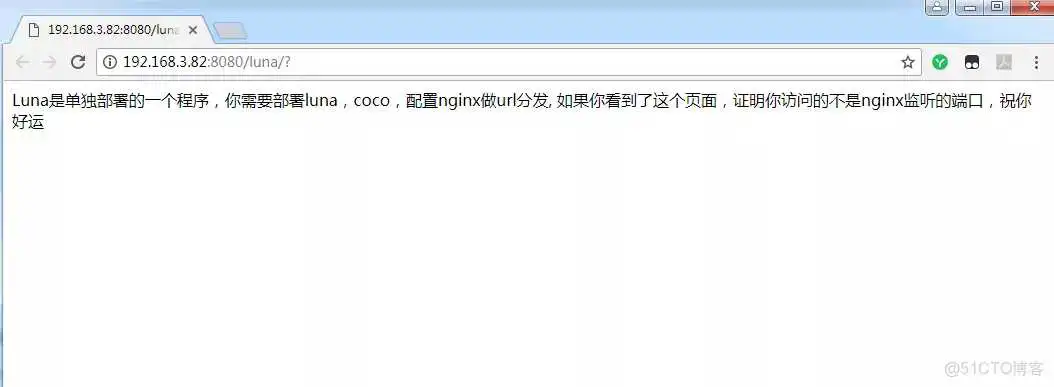
运行之后没有报错信息,就可以使用浏览器访问了http://server_ip:8080

默认用户名/密码:admin/admin此时运行的只是jumpserver的WEB端,如果需要访问访问 Web Terminal 会报错如下
新打开一个 SSH终端连接去安装 下载项目文件
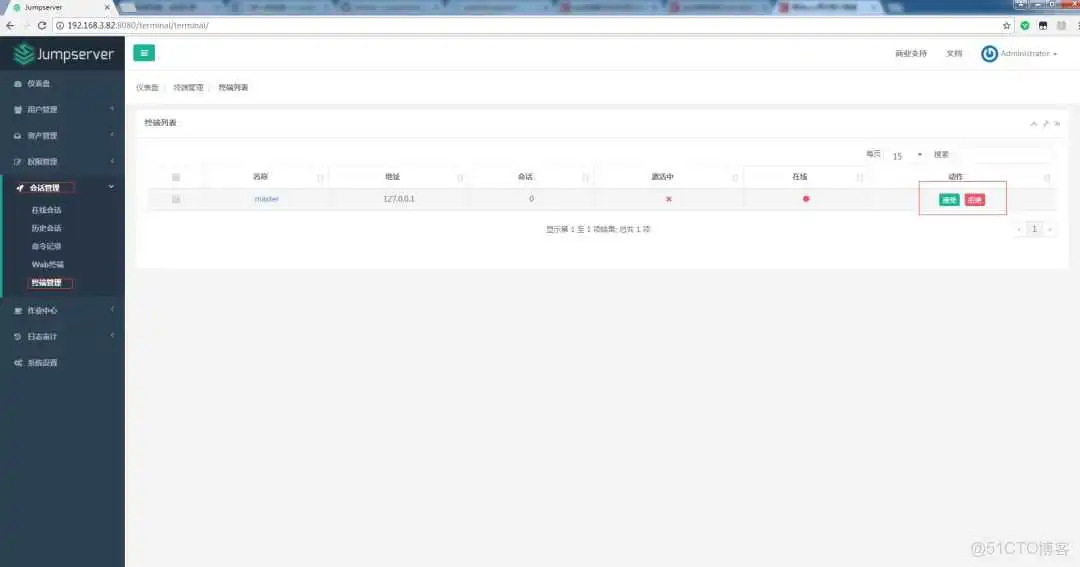
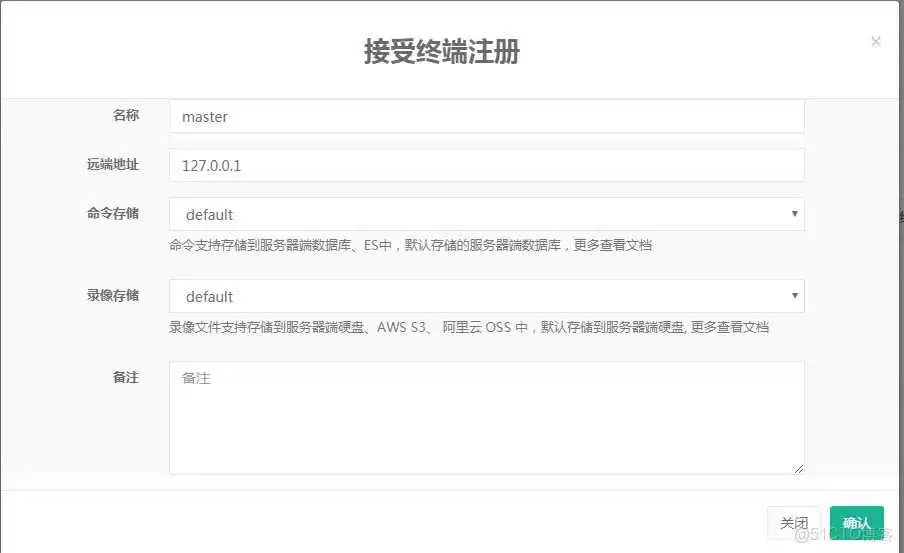
点击确认之后会出现下面的提示
2018-05-09 14:21:23 [service DEBUG] Set app service auth: 9f13a90b-80e4-47ae-b0ad-d825cff70ff0 2018-05-09 14:21:23 [service DEBUG] Service http auth: <jms.auth.AccessKeyAuth object at 0x7f5d1b18de10> 2018-05-09 14:21:23 [app DEBUG] Loading config from server: {"COMMAND_STORAGE": {"TYPE": "server"}, "REPLAY_STORAGE": {"TYPE": "server"}} Wed May 9 14:21:23 2018 Coco version 1.3.0, more see https://www.jumpserver.org Quit the server with CONTROL-C. Starting ssh server at 0.0.0.0:2222 WebSocket transport not available. Install eventlet or gevent and gevent-websocket for improved performance.
- Running on http://0.0.0.0:5000/ (Press CTRL+C to quit) #出现上面的提示表示成功
(py3) [root@master opt]# docker run --name jms_guacamole -d
-p 8081:8080 -v /opt/guacamole/key:/config/guacamole/key
-e JUMPSERVER_KEY_DIR=/config/guacamole/key
-e JUMPSERVER_SERVER=http://192.168.3.82:8080
registry.jumpserver.org/public/guacamole:1.0.0 Unable to find image 'registry.jumpserver.org/public/guacamole:1.0.0' locally Trying to pull repository registry.jumpserver.org/public/guacamole ... 1.0.0: Pulling from registry.jumpserver.org/public/guacamole a2c089: Pull complete abe15a44e12f: Pull complete 409a28e3cc3d: Pull complete a9511c68044a: Pull complete 9d1b16e30bc8: Pull complete 0fc5a09c9242: Pull complete d: Pull complete 3b70003f0c10: Pull complete bce2e: Pull complete d2ab4f: Pull complete 3882b23577d6: Pull complete 9f8b758ebfa6: Pull complete ef5d2d: Pull complete 310fa32446d6: Pull complete a23204f32cd2: Pull complete f3cba08c8ef8: Pull complete f2e3: Pull complete 86d50039bf5c: Pull complete 7041bb4312f0: Pull complete ca5cc9: Pull complete cef49dddf00f: Pull complete 3535ea: Pull complete 2dd70d9a46ce: Pull complete Digest: sha256:ea862bb2e83bc27900bca14b0ab7ab9d4572e716c25a816dc55307b Status: Downloaded newer image for registry.jumpserver.org/public/guacamole:1.0.0 38910abc050cea50fa03acc913e4916fde9d6a1274f6e37a9131ba31 #然后去后台接受注册信息
(py3) [root@master opt]# yum install nginx -y (py3) [root@master opt]# cd /etc/nginx/ (py3) [root@master nginx]# cp nginx.conf nginx.conf.bak (py3) [root@master nginx]# vim nginx.conf server { listen 80;
} } (py3) [root@master nginx]# nginx -t nginx: the configuration file /etc/nginx/nginx.conf syntax is ok nginx: configuration file /etc/nginx/nginx.conf test is successful (py3) [root@master nginx]# nginx (py3) [root@master nginx]# lsof -i :80 COMMAND PID USER FD TYPE DEVICE SIZE/OFF NODE NAME nginx 24269 root 6u IPv4 0t0 TCP *:http (LISTEN) nginx 24270 nginx 6u IPv4 0t0 TCP *:http (LISTEN)
[root@test ~]# ssh -p2222 jumpserver@192.168.3.82 jumpserver@192.168.3.82's password:
Opt> p
总共: 2 匹配: 2 Opt> 1 Connecting to testsysuser@3.26 0.6 [testsysuser@linux1 ~]$ pwd /home/testsysuser [testsysuser@linux1 ~]$ ip add |grep 192.168.1. inet 192.168.3.26/24 brd 192.168.3.255 scope global ens160 #可以正常用系统用户来登录客户端主机了
到此这篇服务器部署python环境(服务器搭建python环境)的文章就介绍到这了,更多相关内容请继续浏览下面的相关推荐文章,希望大家都能在编程的领域有一番成就!版权声明:
本文来自互联网用户投稿,该文观点仅代表作者本人,不代表本站立场。本站仅提供信息存储空间服务,不拥有所有权,不承担相关法律责任。
如若内容造成侵权、违法违规、事实不符,请将相关资料发送至xkadmin@xkablog.com进行投诉反馈,一经查实,立即处理!
转载请注明出处,原文链接:https://www.xkablog.com/pythonbc/49230.html